The Russians waited patiently while the German LMG edged into position , coming in on the Northern end of the map edge. The German LMG maneuvered to keep out of the LOS of the Russian Maxim until they were in position in the woods. At this point the Russian MMG opened fired but to no effect.
The LMG gained 6 more APs from an action card and commenced to lay down fire on the Russian MMG. The Russians were lucky to emerge from that hail of bullets with just a broken unit.
The second German MG then moved onto the board and the Russians were relieved to see that they were not moving in to have another crack at the Maxim. The German LMG moved into the central woods obviously preparing to bring some firepower to bear on the Russian rifle squads.
The Russians were worried; they could not just allow the German LMGs to pummel them from long range, so the Rifle squad on the Russian left started advancing to the small copse , screened from the advancing German LMG, to distract the Germans from the objective and to close the range.
As follow on German squads started moving up to join the LMG more Russian squads threw caution to the winds and moved up out of the woods toward the German LMG. German CAPs had been spent on the Maxim MG gun battle so the LMG could only respond by adjusting its facing, to avoid being outflanked. This helped as one Russian squad fired at close range, did not get the flank advantage and did not affect the German LMG unit. The German squad coming up in support of the LMG was more accurate and broke the Russian rifle squad. A second Russian squad advanced into the same hex as the German LMG, gambling on gaining the initiative next turn, as it could not do no more that turn.
At the end of turn 1 the Russians gained 1 VP for holding the objective. No losses at this time, but two broken Russian units and 1 broken German.
Both sides commited 2 CAPs to the initiative roll and it went to the Russians. The melee occurred and the German LMG squad was broken. The Germans decided that discretion was the better part of valor and the German LMG advanced out of the melee hex, toward the Russian objective, keeping its front facing toward the hex it has just left.
This allowed the Russian Rifle squad nearby to recover. A German Rifle squad moved into extract revenge for the death of the German LMG team but it did not go well for them and a heroic Russian response killed the German squad. To add to the Russian successes, the Maxim recovered.
The German LMG moved into the objective , but kept their facing toward the rear where the nearest Russian squads were celebrating their successes. However the Russian reinforcements entered the map and group moved up the road until they were in LOS and range of the German LMG on the objective hex. A group fire eliminated the Germans.
In a coup de grace a Russian squad moved in from behing the copse on the Russian left and, braving manchine gun fire from the surviving German LMG , reoccupied the objective as the last act of turn 2.
At this point the Germans, face with havely losses and reducec CAPs, surrendered.
Saturday, September 26, 2015
Monday, September 7, 2015
Scenario #2 Hedgerows and Hand Grenades
Place : Normandy, France
Date : July 1944
A description of scenario 2 : Hedgerows and Hand Grenades from the GMT Games board game Combat Commander : Europe
www.gmt.games


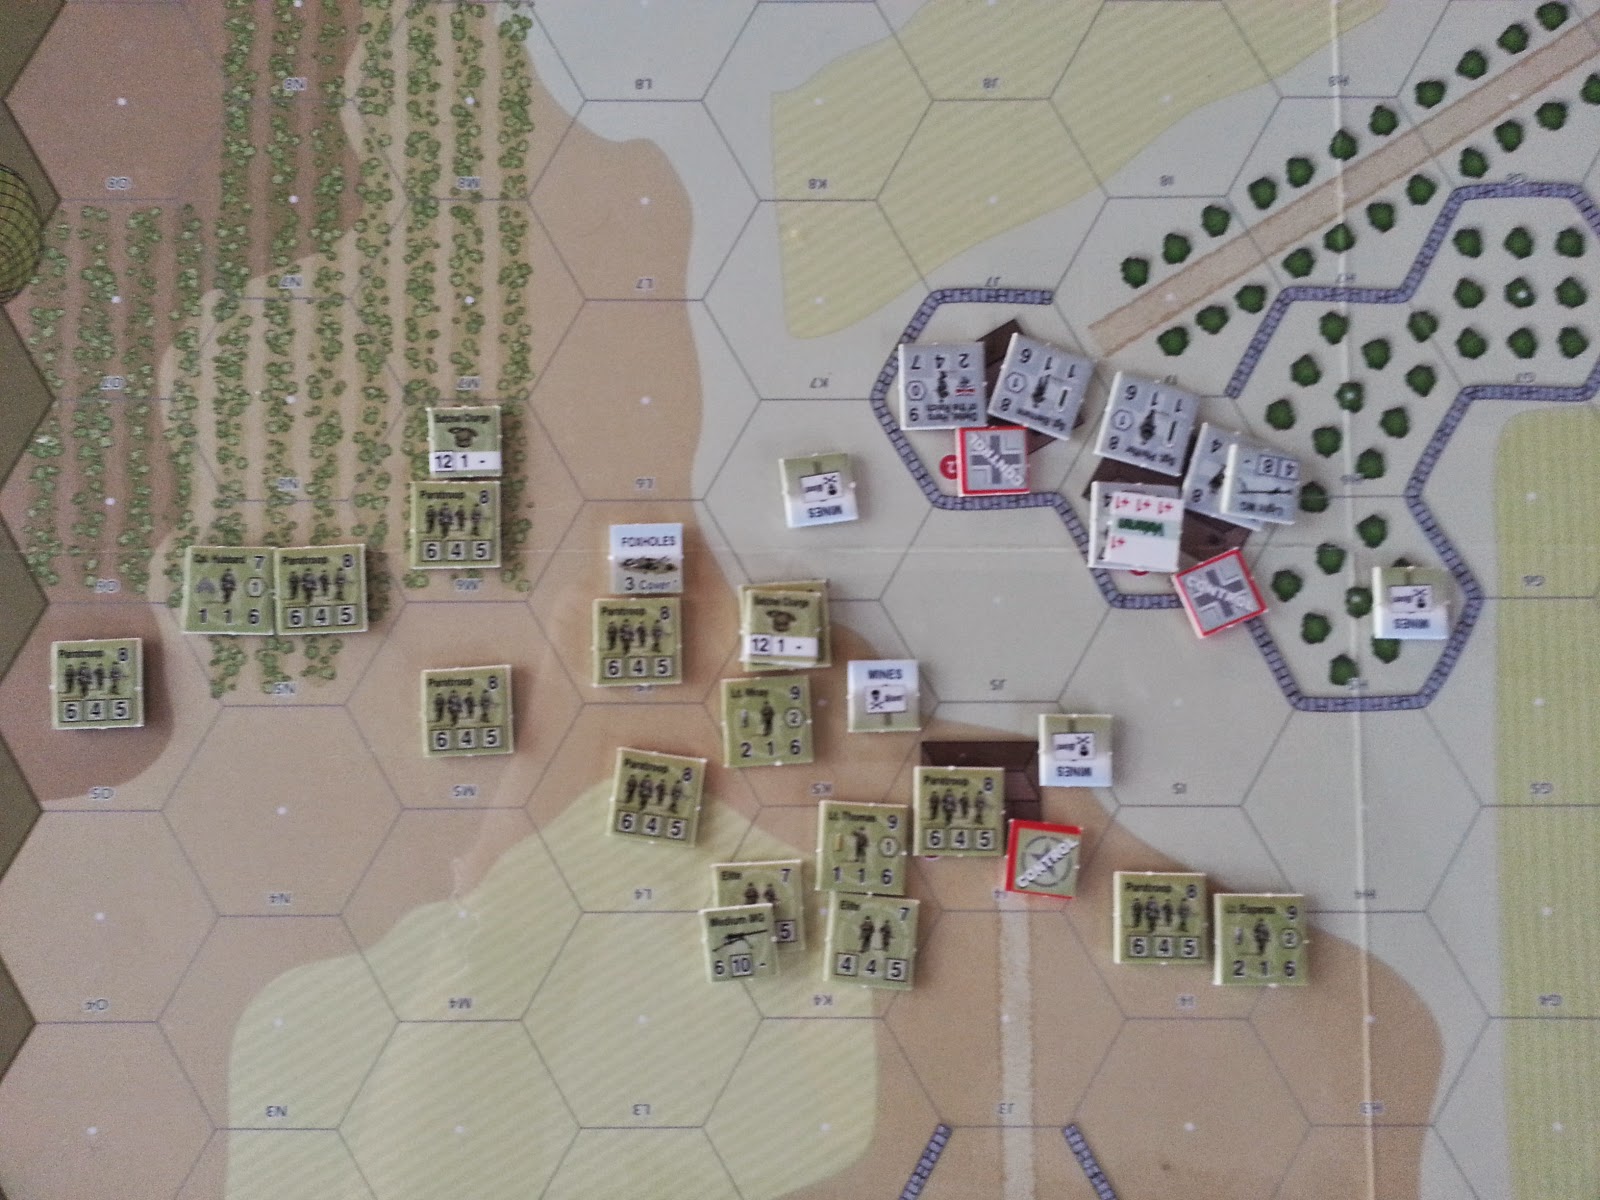
Sgt. Smith in the center took advantage of the German tactical withdrawal and scrambled forward into the objective 3 farmhouse. This was a 4 VP swing as each objective was worth 2 VPs. Smith and his men were relieved to take the first objective without a fight. Just as they moved in , a breeze sprang up and cleared the smoke exposing German conscript squads on the road outside the farmhouse, that had been tardy in their withdrawal. Excellent timing , for the Americans...
The nearest conscript squad was rapidly broken and then routed off the board with a "12", a stroke of bad luck that brought Blenkinship onto the map to rejoin his squads on the US left flank. The other Conscript squad was also broken, and met the same fate a couple of turns alter.
Rattenhaus, having fallen back from the center to the HMG line, took his squads to the German left and was looking for an opportunity to move off the map.
Hubbard and his two squads were blocking this exit, but were in the line of fire of the German HMG so were feeling a little under matched.

Date : July 1944
A description of scenario 2 : Hedgerows and Hand Grenades from the GMT Games board game Combat Commander : Europe
www.gmt.games
Setup
Sgt. Smith was in the center with the MMG and 2 squads, Hubbard was on the US right with the mortar looking down the road, and Blenkinships men were leaderless on the left.
The US had drawn a double exit points open objective so Blenkinship, taking advantage of his free deployment, was off at the other end of the map ready to exit and rejoin his squads.
The Germans had setup a defense in depth, with a strong presence in the center of the map around objectives 3 and 4 ; Rattenhaus was in objective 3 with a squad, along with a squad in the adjacent building. Esser was in the bocage surrounded field to the right of Rattenhaus with two squads.
To the rear the two German HMGs were positioned in a strong second line of defense, with Biermann and Schrader.

Opening Salvo
American artillery dropped dense smoke which drifted right onto objective 3. As a result the Germans fell back from the farmhouse complex without firing a shot! Esser and his squad remained behind in the bocage, rather exposed, as a forlorn hope.
Blenkinship moved off the map and scored a quick 4 VPs and waited patiently on the Time track to rejoin the action.
Blenkinship moved off the map and scored a quick 4 VPs and waited patiently on the Time track to rejoin the action.

Sgt. Smith in the center took advantage of the German tactical withdrawal and scrambled forward into the objective 3 farmhouse. This was a 4 VP swing as each objective was worth 2 VPs. Smith and his men were relieved to take the first objective without a fight. Just as they moved in , a breeze sprang up and cleared the smoke exposing German conscript squads on the road outside the farmhouse, that had been tardy in their withdrawal. Excellent timing , for the Americans...
The nearest conscript squad was rapidly broken and then routed off the board with a "12", a stroke of bad luck that brought Blenkinship onto the map to rejoin his squads on the US left flank. The other Conscript squad was also broken, and met the same fate a couple of turns alter.
 |
| Smoke blows away , exposing a target rich environment |
Rattenhaus, having fallen back from the center to the HMG line, took his squads to the German left and was looking for an opportunity to move off the map.
Hubbard and his two squads were blocking this exit, but were in the line of fire of the German HMG so were feeling a little under matched.
Chaos in the center!

Smith, now securely installed in objective 3 along with the MMG , called in artillery on the German HMG in objective 5. The US MMG was able to join in on occasion. The conscripts manning the German HMG and Biermann were quickly broken and only saved by the timely arrival of Herzog, who helped them to rally successfully. However their rally was brief and they were broken again and routed out of the woods. Allied airpower then added to the German misfortune and broke Esser , who had been sitting quietly in his bocage fortress all this time. The German squads with Esser managed to fall back with a Rout roll leaving Esser broken and isolated. Shortly thereafter a sniper took him out! The Germans best leader eliminated without making a significant contribution to the fight.
All this time Schrader and the other German HMG traded fire with Hubbard and his mortar team rather inconclusively.
Smith moved out of objective 3 into the bocage surrounded field recently occupied by Esser and started to move threateningly toward the broke Biermann
All this time Schrader and the other German HMG traded fire with Hubbard and his mortar team rather inconclusively.
Smith moved out of objective 3 into the bocage surrounded field recently occupied by Esser and started to move threateningly toward the broke Biermann
Things at this time were looking very bleak for the Germans. A run of lucky events and a dearth of German recover cards had taken their toll. But then a rare foray by the Luftwaffe struck lie a bolt from the blue and broke Sgt Smith his MMG team and accompanying squad. Then, the US discard looking for a Recover card triggered a German reinforcement : an SS squad! In what turned out to be a fortunate move for Sgt Smith at least, he was routed out of the way as the SS squad moved in to melee, and with a couple of ambushes obliterated the central US weapons team and squad ,along with the MMG. The US center now only comprised a broken Sgt Smith. The US steamroller had been stalled.
A lone US squad detached from Hubbards group and moved back in to objective 3, by way of objective 4 to confront the SS squad, and to distract them from the still broken Sgt Smith. Blenkinship was also moving in to cover Smith from the US right in a race to save Smith and plug the hole in the US lines. The SS squad decided to leave Smith alone and meleed the nearby US squad in objective 3. Neither side had been able to prepare any ambushes, but the US held the initiative. It was not needed as the Germans lost the melee by the closest of margins. Smith breathed a sigh of relief and then recovered.
At this point the Germans were three units away from the surrender level and had lost their best leader and one HMG. But they were not out of the fight and the Time marker was only on 4 (out of 8). The VP marker was hovering around zero.
However time had run out for the players and so an honorable draw was called.
Monday, November 10, 2014
Scenario 12 :Misty Mountain
Place : Monte Castello, Italy
Date : December 12 1944
A description of scenario 12 : Misty Mountain from the GMT Games board game Combat Commander : Europe
www.gmt.games

Fog shrouded the mountains and the green Brasilian troops nervously moved into their start positions. They were unaware of the locations of the waiting German troops, a severe handicap. But the fog was a handicap to both sides, a 3 hindrance cumulative to any other LOS hindrance.
Hubbard, with 3 squads and an MMG was on the right, hoping to push down the road and off the map. Blenkinship was on the left with three squads and the other MMG. His immediate task was to take objectives 1 and 3, and then await further orders. Jensen was in the orchard in the middle with 3 squads, prepared to support either flank as the situation developed. In the figure above , Jensen has moved off to the left from his original start position in the orchard, attempting to block Pfeifer.
The Germans were setup with Pfeifer , a squad and a team in a building at hex F8, a very forward location, looking to exit the map. Bierman, a squad and an LMG were in the building of objective 3 (D6), with a squad backing them up just behind the objective in another building . One squad was setup on the woods covered hilltop just behind the major objective 4. There was a little command confusion here as the German command thought that any point on the hilltop was the objective.
The bulk of the German forces were setup on the hill top and ridge that included objective 5. The ridge was heavily fortified with bunkers and trenches.
Jensen reacted quickly to the advanced deployment of Pfeifer and moved to the left, moving out of the cover of the orchard in the early morning mist to block an easy German exit.
Pfeifer engaged one of the blocking squads and in the ensuing melee the Brasilians fought well, ambushing the advancing Germans twice before being overwhelmed.

Pfeifer got most of his troops off the map, with one German team falling to the Brazilians. Not a good start for the Allies, more VPs added to the already daunting German total, and precious time wasted.
A tentative advance on the US right through the orchard drew fire from the German HMG on the mountain top. This caused the nervous Allied commander to think twice, even with the mist giving cover. More progress was made on the Allied left as the Brazilians move into the buildings , taking objective 1 and moving up on objective 3.
Reinforcements in the shape of Sgt. Smith arrived in fairly short order with a horde of green troops. They were positioned in the middle and to the right of the Allied positions. Smith had orders to take objective 4, which the Germans had mysteriously left unoccupied. Sgt. Pfeifer and two teams reappeared in the German rear.

Blenkinship pushed up on the left, and got into the buildings without too much trouble taking objective 1, and started a firefight with the Germans in objective 3. After breaking the Germans the Brazilians stormed the objective successfully. However Blenkinship and his squad then got pinned in the objective 4 building, and were not able to recover. The stone wall surrounding the building had them trapped. Heavy consistent fire from the German HMG on the hilltop took its toll, and Blenkinship and the squad perished. A heavy price to pay from one lowly objective.
Smith, the best leader the Allies had, took his green troops right up the center, in the shadow of the trees and moved into objective 4. This turn of events was a surprise to the Germans, as up to that point they thought the entire hill top comprised the objective and led to an 8 VP swing in the Allies favor. The Allies had been reducing the German VP lead, but it was still 6 or 7 points in the German favor. It would have been closer to zero but the German events repeatedly rewarded the Germans for holding on to their existing objectives.

On the right the Allies had belatedly realized the value of the medium mortars smoke ability. With no direct line of sight to the German HMG on the hill top, they started dropping smoke close to the HMG, allowing Allied units to move up the right side of the map unhindered.
Hubbard did manage to get a couple of squads off the map, capturing objective 2 on the way, but this left behind scattered Allied squads with no leaders on the right. The Germans quickly recaptured objective 2 once Hubbard was out of the way.
So at this point , time was moving along. Heavy casualties on the left had stalled the Allies, although the objectives remained in their hands. In the middle, Sgt. Smith had a good grip on the valuable objective 4, but was forced to stay there to prevent its recapture. On the right , there was no leader, but a lot of squads milling about.
Another Time event brought Hubbard back on the right, and Jensen had moved into the area to organize a mass advance off the map. But at this point one more time event would end the game. The Allies were stuck between discarding to get move cards to kick start the advance, and running through their deck triggering Time. The deck ran out before the move cards arrived, and the Germans scored a solid victory.
Date : December 12 1944
A description of scenario 12 : Misty Mountain from the GMT Games board game Combat Commander : Europe
www.gmt.games
Setup
Hubbard, with 3 squads and an MMG was on the right, hoping to push down the road and off the map. Blenkinship was on the left with three squads and the other MMG. His immediate task was to take objectives 1 and 3, and then await further orders. Jensen was in the orchard in the middle with 3 squads, prepared to support either flank as the situation developed. In the figure above , Jensen has moved off to the left from his original start position in the orchard, attempting to block Pfeifer.
The Germans were setup with Pfeifer , a squad and a team in a building at hex F8, a very forward location, looking to exit the map. Bierman, a squad and an LMG were in the building of objective 3 (D6), with a squad backing them up just behind the objective in another building . One squad was setup on the woods covered hilltop just behind the major objective 4. There was a little command confusion here as the German command thought that any point on the hilltop was the objective.
The bulk of the German forces were setup on the hill top and ridge that included objective 5. The ridge was heavily fortified with bunkers and trenches.
Vamanos!
Jensen reacted quickly to the advanced deployment of Pfeifer and moved to the left, moving out of the cover of the orchard in the early morning mist to block an easy German exit.
Pfeifer engaged one of the blocking squads and in the ensuing melee the Brasilians fought well, ambushing the advancing Germans twice before being overwhelmed.
Pfeifer got most of his troops off the map, with one German team falling to the Brazilians. Not a good start for the Allies, more VPs added to the already daunting German total, and precious time wasted.
A tentative advance on the US right through the orchard drew fire from the German HMG on the mountain top. This caused the nervous Allied commander to think twice, even with the mist giving cover. More progress was made on the Allied left as the Brazilians move into the buildings , taking objective 1 and moving up on objective 3.
Reinforcements in the shape of Sgt. Smith arrived in fairly short order with a horde of green troops. They were positioned in the middle and to the right of the Allied positions. Smith had orders to take objective 4, which the Germans had mysteriously left unoccupied. Sgt. Pfeifer and two teams reappeared in the German rear.
Success On the Left Turns to Disaster
Blenkinship pushed up on the left, and got into the buildings without too much trouble taking objective 1, and started a firefight with the Germans in objective 3. After breaking the Germans the Brazilians stormed the objective successfully. However Blenkinship and his squad then got pinned in the objective 4 building, and were not able to recover. The stone wall surrounding the building had them trapped. Heavy consistent fire from the German HMG on the hilltop took its toll, and Blenkinship and the squad perished. A heavy price to pay from one lowly objective.
Success In the Middle
Smith, the best leader the Allies had, took his green troops right up the center, in the shadow of the trees and moved into objective 4. This turn of events was a surprise to the Germans, as up to that point they thought the entire hill top comprised the objective and led to an 8 VP swing in the Allies favor. The Allies had been reducing the German VP lead, but it was still 6 or 7 points in the German favor. It would have been closer to zero but the German events repeatedly rewarded the Germans for holding on to their existing objectives.
Too Little Too Late
On the right the Allies had belatedly realized the value of the medium mortars smoke ability. With no direct line of sight to the German HMG on the hill top, they started dropping smoke close to the HMG, allowing Allied units to move up the right side of the map unhindered.
Hubbard did manage to get a couple of squads off the map, capturing objective 2 on the way, but this left behind scattered Allied squads with no leaders on the right. The Germans quickly recaptured objective 2 once Hubbard was out of the way.
So at this point , time was moving along. Heavy casualties on the left had stalled the Allies, although the objectives remained in their hands. In the middle, Sgt. Smith had a good grip on the valuable objective 4, but was forced to stay there to prevent its recapture. On the right , there was no leader, but a lot of squads milling about.
Another Time event brought Hubbard back on the right, and Jensen had moved into the area to organize a mass advance off the map. But at this point one more time event would end the game. The Allies were stuck between discarding to get move cards to kick start the advance, and running through their deck triggering Time. The deck ran out before the move cards arrived, and the Germans scored a solid victory.
In hindsight
A catalog of errors on the Allied side cost them the victory; too tentative in advancing through the mist cost them too much time. Realizing the benefit of smoke too late. Leaving the green squads leaderless on the right and perhaps getting distracted by Pfeifer and his dash off the map in the early going all contributed to a lack luster performance. The Brazilians fought well but their high command let them down.Saturday, October 18, 2014
Scenario 11 : Hold The Line
Place : St.Jean de Daye, France
Date : July 8th ,1944
A description of scenario 11 : Hold The Line from the GMT Games board game Combat Commander : Europe
www.gmt.games
One U.S team was dug in on the hill top next to the tank(E3). If need be, Buehler could run the HMG up there to get a better view.
Sgt.White , one elite squad and one weapons team were dug in on objective 5, armed with their captured panzerfausts.
As dawn broke the SS troopers appeared, all but one squad hidden from view of the tank. Their start line was behind objective 1 and the hedges. It looked like objective 5 was to be their immediate target, hiding from the tank.

The Germans were ready for this move, eliminating the US team and wounding SgtWhite with three(!) assault cards. The wounded Sgt.White and his remaining squad won the melee dispatching the broken S.S. squad, and were able to briefly contemplate the prospect of escaping passed the advancing Germans to exit the map and go for help. This was not on the cards as Sgt.Ganz, an S.S. squad and a weapons team advanced into melee with Sg.White and won the day.
The fight for objective 5 was over, the US side suffering a bloody setback. The 8 VP swing swept the victory marker into German territory, with the German high command awarding 3 extra VPs for objectives already in German hands . The only bright spot in the gloom that settled over the U.S. side was that Lucas, the U.S. hero had shown up in the slit trenches just above the tank.
Ganz setup the HMG on objective 5 and started laying down very effective fire on the US weapons team in their slit trenches next to the stranded Sherman. The Sherman main gun was very inaccurate , and the HMG not much better. In short order the US team on the hill was eliminated. At this point , the first time marker had not occurred, and the US was over half way towards its surrender level. US morale was low. From the U.S. viewpoint it looked like the battle was going all Germanys way. The U.S. casualties were mounting rapidly, only the tank crew and Lucas were left to withstand the German onslaught.
With every time marker advancement the VP marker moved closer to U.S territory, and the U.S commanders personal morale level started to improve. But would the game last long enough for the VPs to swing to the U.S side? It was a stalemate, as all the U.S reinforcements were in place in and around the now heavily defended objective 4, except for one lone US squad on the far right waiting in the woods to delay any German attempt off the map. The Germans did not seem to want to risk advancing beyond objective 5 to exit the map and the U.S. was too close to the surrender level to risk assaulting objective 5. Lucas did move into the trees below objective 5, and was thinking of rushing the objective at some point.
Lucas ran up to the engineers in the woods and grabbed the flamethrower. A strange torpor settled over the Germans as the flamethrower wielding hero ran back up to the hill top the engineers had just vacated. He finished off poor Lt.Ganz along with his accompanying weapons team. Now the U.S reclamation of objective 5, along with the demise of Ganz and the LMG weapons team had pushed the VP score firmly into US territory.
Flushed with success and throwing caution to the winds Lucas moved out of the slit trenches to rain fire down on another now leaderless German squad as the U.S engineer squad moved up toward the objective 5 hill top. The Germans shrugged off this attack and moved in to melee with the troublesome Lucas. However Lucas performed heroically, ambushing the approaching Germans and won the day, prompting the German commander to resign.
Date : July 8th ,1944
A description of scenario 11 : Hold The Line from the GMT Games board game Combat Commander : Europe
www.gmt.games
Setup
After the previous days fighting the lone disabled Sherman tank was stuck beside objective 4 (hex F2). It had a good view of the hilltop objective 5 and the region to the right to deter any German exit off the map if they captured objective 5, and was well placed to defend all approaches to objective 4. Sgt.Buehler was stationed in the tank with the 50 cal while the two remaining tankers manned the main gun.One U.S team was dug in on the hill top next to the tank(E3). If need be, Buehler could run the HMG up there to get a better view.
Sgt.White , one elite squad and one weapons team were dug in on objective 5, armed with their captured panzerfausts.
As dawn broke the SS troopers appeared, all but one squad hidden from view of the tank. Their start line was behind objective 1 and the hedges. It looked like objective 5 was to be their immediate target, hiding from the tank.
This is NOT Going Well!
The Germans immediately moved off from their start positions, leaving the tank and its guns helpless to intervene as they moved toward objective 5. Opportunity fire from Sgt.White on the hilltop broke one German squad but assault fire from the Germans was very accurate and had Sgt. White, the squad and the team cowering in the dirt. This gave the Germans an unopposed move up the slopes of the hill as they closed in on the hill top. Sgt.White and the men swiftly recovered their composure, and managed to break one of the German squads as the Germans got within melee range. Sgt. White could either wait for the inevitable assault or take matters into his own hands. He chose the latter course and advanced out of the trenches to melee with the broken SS squad. |
Germans move in on objective 5 |
The Germans were ready for this move, eliminating the US team and wounding SgtWhite with three(!) assault cards. The wounded Sgt.White and his remaining squad won the melee dispatching the broken S.S. squad, and were able to briefly contemplate the prospect of escaping passed the advancing Germans to exit the map and go for help. This was not on the cards as Sgt.Ganz, an S.S. squad and a weapons team advanced into melee with Sg.White and won the day.
The fight for objective 5 was over, the US side suffering a bloody setback. The 8 VP swing swept the victory marker into German territory, with the German high command awarding 3 extra VPs for objectives already in German hands . The only bright spot in the gloom that settled over the U.S. side was that Lucas, the U.S. hero had shown up in the slit trenches just above the tank.
Ganz setup the HMG on objective 5 and started laying down very effective fire on the US weapons team in their slit trenches next to the stranded Sherman. The Sherman main gun was very inaccurate , and the HMG not much better. In short order the US team on the hill was eliminated. At this point , the first time marker had not occurred, and the US was over half way towards its surrender level. US morale was low. From the U.S. viewpoint it looked like the battle was going all Germanys way. The U.S. casualties were mounting rapidly, only the tank crew and Lucas were left to withstand the German onslaught.
The Eye Of The Storm
An odd thing happened at this juncture. A strange calm befell the battlefield. The Germans, having claimed objective 5, retreated out of sight of the tank and waited, leaving objective 5 in German control but unoccupied. Time passed and U.S. reinforcements arrived, but they were more of a hindrance than useful. The U.S. was not contemplating an assault on objective 5, and could not tolerate losing the reinforcements to the casualty track, and so had to keep them in the trees behind objective 4.With every time marker advancement the VP marker moved closer to U.S territory, and the U.S commanders personal morale level started to improve. But would the game last long enough for the VPs to swing to the U.S side? It was a stalemate, as all the U.S reinforcements were in place in and around the now heavily defended objective 4, except for one lone US squad on the far right waiting in the woods to delay any German attempt off the map. The Germans did not seem to want to risk advancing beyond objective 5 to exit the map and the U.S. was too close to the surrender level to risk assaulting objective 5. Lucas did move into the trees below objective 5, and was thinking of rushing the objective at some point.
The Engineers (and a Hero) to the Rescue
Then a fortuitous discard by the Germans changed everything; the U.S. rolled on the support table and who shows up but a squad of engineers armed with a flamethrower. The Germans thought about it but did not use the initiative card to generate a reroll; a decision that they were to regret. Lt. Ganz, securely sheltered behind the German controlled, but unoccupied objective 5 was shocked to see the U.S. Engineers appear out of nowhere back in the slit trenches of objective 5. With an assault fire action the Engineers broke Ganz and then skedaddled into the nearby forest to meet up with Lucas.Lucas ran up to the engineers in the woods and grabbed the flamethrower. A strange torpor settled over the Germans as the flamethrower wielding hero ran back up to the hill top the engineers had just vacated. He finished off poor Lt.Ganz along with his accompanying weapons team. Now the U.S reclamation of objective 5, along with the demise of Ganz and the LMG weapons team had pushed the VP score firmly into US territory.
 |
| Lucas storms objective 5 |
Flushed with success and throwing caution to the winds Lucas moved out of the slit trenches to rain fire down on another now leaderless German squad as the U.S engineer squad moved up toward the objective 5 hill top. The Germans shrugged off this attack and moved in to melee with the troublesome Lucas. However Lucas performed heroically, ambushing the approaching Germans and won the day, prompting the German commander to resign.
Thursday, September 4, 2014
Scenario 10 :Commando School
Place : Novorossiysk, Russia
Date : February 4th 1943
A description of scenario 10 : Commando School from the GMT Games board game Combat Commander : Europe
www.gmt.games
Lt. Schrader perused the map in his makeshift command center. A reconnaissance report had revealed the locations of the Russian commandos in the town; a Russian HMG, weapons team, squad and leader were deployed in a small building close to the edge of town (K5) as the lynchpin of the defense. A squad, weapons team and a leader were hidden in a building over by the lake (J6) Another Russian squad was in the same building (I6). These units were covering the road on the far side of the lake . On the Russian left flank there was a lone squad holed up in a building isolated from his leaders. This seemed to be the weak point of the Russian defense offering a route to bypass the Russian HMG, rendering it ineffective unless it fell back.
Schrader positioned Sgt. Esser and one squad with an HMG forward to a building where they could see the isolated Russian squad, but they themselves could not be seen by the Russian HMG(M3). Sgt. Bierman was sent to the extreme right flank with the two squads of Pioneers, armed to the teeth with a flamethrower and a satchel charge. Their initial position was also out of site of the rather deadly looking Russian HMG.
The German HMG was to suppress the lone Russian squad on the German right flank while Biermann and his pioneers moved in for the kill. Then the pioneers would move further into the town turning the Russian flank and prompting a Russian withdrawal. Smoke would be deployed to provide cover from the Russian HMG. The pioneer squads would have a corridor open to exit the map should they so desire, bagging a few objectives along the way.
Schrader himself stayed in reserve with three squads. There he could threaten the left flank if the Russians moved to the right to counter the pioneers, and block any move the Russians might make off the map.
The stage was set, and all awaited Schraders signal. Esser and the HMG team settled in with their sites set on the lonely Russian squad. All they needed was the fire command.
Date : February 4th 1943
A description of scenario 10 : Commando School from the GMT Games board game Combat Commander : Europe
www.gmt.games
Setup
Lt. Schrader perused the map in his makeshift command center. A reconnaissance report had revealed the locations of the Russian commandos in the town; a Russian HMG, weapons team, squad and leader were deployed in a small building close to the edge of town (K5) as the lynchpin of the defense. A squad, weapons team and a leader were hidden in a building over by the lake (J6) Another Russian squad was in the same building (I6). These units were covering the road on the far side of the lake . On the Russian left flank there was a lone squad holed up in a building isolated from his leaders. This seemed to be the weak point of the Russian defense offering a route to bypass the Russian HMG, rendering it ineffective unless it fell back.
Schrader positioned Sgt. Esser and one squad with an HMG forward to a building where they could see the isolated Russian squad, but they themselves could not be seen by the Russian HMG(M3). Sgt. Bierman was sent to the extreme right flank with the two squads of Pioneers, armed to the teeth with a flamethrower and a satchel charge. Their initial position was also out of site of the rather deadly looking Russian HMG.
The German HMG was to suppress the lone Russian squad on the German right flank while Biermann and his pioneers moved in for the kill. Then the pioneers would move further into the town turning the Russian flank and prompting a Russian withdrawal. Smoke would be deployed to provide cover from the Russian HMG. The pioneer squads would have a corridor open to exit the map should they so desire, bagging a few objectives along the way.
Schrader himself stayed in reserve with three squads. There he could threaten the left flank if the Russians moved to the right to counter the pioneers, and block any move the Russians might make off the map.
The stage was set, and all awaited Schraders signal. Esser and the HMG team settled in with their sites set on the lonely Russian squad. All they needed was the fire command.
 |
Initial PositionsAchtung!
Schrader gave the signal and Biermann and the pioneers moved off up the right flank. They used smoke grenades to cover their progress from the Russian HMG and cautiously moved toward the house occupied by the Russian squad. The German HMG started laying down covering fire and succeeded in breaking the Russian commando squad. With the Russian squad broken the Pioneers moved in on the building occupied by the Russian squad. Now they were completely screened from the Russian HMG and ready to bring their weapons to bear.

The pioneers swiftly dispatched the Russian squad, using the flamethrower and firepower. To counter this potential breakthrough the Russian HMG and accompanying units withdrew into the trees behind its start position so that they could set their sights on the pioneers and cover the terrain the pioneers would have to cross if they attempted a fast exit up the German right flank. Not wishing to risk running that gauntlet the pioneers moved back out of the building they had just taken, to await further developments.
The withdrawal of the Russian HMG brought it into the line of fire of the German HMG commanded by Esser. The German HMG was ensconced in a building, the Russian in the slightly less effective cover of the trees. A machine gun duel ensued, the German gunners eventually getting the better of the situation, killing the Russian leader and driving the Russian HMG to withdraw further into the woods, A Russian hero did pop up to replace the fallen leader.
Move Out!
The forced withdrawal of the Russian HMG allowed Schrader to move up in the center in relative safety and take residence in the building at M5. This allowed them to target the Russian squads in the building complex near the lake, around J6. Some good shooting there, combined with sniper activity that wounded the Russian leader quickly had the Russians in trouble. At one point it looked like by sheer firepower alone the Russians in the building in the center would be eliminated. However the broken squads recovered and total collapse of the Russian center was avoided, but Russian leader was eliminated.
Taking advantage of the temporary suppression in the Russian center and with the breakout of the Pioneers hindered by the repositioning of the Russian HMG, Schrader started moving off up the left flank on the far side of the lake. However they ran into wire at a choke point and were in some disarray as some opportunity fire from the Russians on the other side of the lake was rather effective. Temporarily Schrader pulled his troops back , but shortly thereafter he tried again with just one squad, half gambit to distract and half serious attempt.
At this point time was moving along and although the Russians has suffered one squad and two leaders as casualties the Germans had not really made any major inroads on Russian territory ; the pioneers were a little overawed by the power of the Russian HMG stack and on the left flank Schrader was doggedly making slow progress on the left flank through mines, wire and opportunity fire. The victory point track was a few points in the Russians favor. The German secret objective gave the Russians one more VP as they held 3 objectives to the German 2. The key to victory seemed to be to push harder to get squads off the map (exit points doubled). Probably anticipating this, to block Schrader on the German left, the Russians moved the Russian HMG and squad further back. The HMG ended up toward objective 3 at the far end of the lake, leaving the Russian Hero and one squad alone in the woods at I4, near the pioneers who had been keeping a low profile up to this point because of the HMG.
The Machine Gun is Gone!
With the Russian HMG gone, the emboldened pioneers , still armed with a flamethrower, moved in on the isolated Hero and squad. However the pioneer squad carrying the flamethrower was targeted and suppressed, on the road outside the building and so could not bring the lethal flammenwerfer to bear. The satchel charge was ineffective and so a short stalemate in this little corner of the battlefield ensued. Time had reached the first sudden death roll, but the battle did not end. If it had ended at that point, it would probably have been a Russian victory.
 Heroic Action
This local stalemate was broken by the arrival of Dietel a German hero. He grabbed the flamethrower from the suppressed pioneer squad and squirted flame repeatedly until the Russian squad was eliminated. Some Russian walking wounded had shown up just to the rear of the pioneers. Dietel jumped up, hoisting the 50lbs of flamethrower as if it was some sort of toy, raced over to the walking wounded and eliminated them.
Another walking wounded event (for the Germans) caused a very surprised wounded Russian leader to appear out of nowhere in amongst the German HMG position, where a brief melee ensued. The wounded Russian leader did manage to ambush the German leader, Esser, but he could not overcome the squad and he did not survive the melee.
This flurry of Russian casualties moved the VP track into positive German territory just in time as a third sudden death roll ended the game.
It turned out that the Russian secret objective , and a second secret objective he had been given during the battle awarded 4 VPs to objective 4, which was firmly in German hands, turning a close German victory into a fairly comfortable one. Schrader surveyed the battle ground with a grim satisfaction. It had been close, but his men had carried the day and suffered no casualties. The Russian propaganda machine would try and paint a closer picture, but he knew the truth. :)
Russian After Action Report
The battle hung in the balance until the last roll of the last turn. Early on both heroic comrade commanders lost their lives fighting for the Motherland, and Russian units were thereafter handicapped by being without leaders for most of the battle. Unknown to the Axis enemy, the Russian original Secret Objective, as well as a random Secret Objective drawn as an event, provided points for Objective 4, unapproachably deep behind Axis lines. So, the Russians needed to hold their victory point advantage to at least four, or they would lose. The game needed to end on the first sudden death roll. However, such things were not to be.
The turning point in the battle occurred when the Axis Hero was handed the flamethrower, and given several consecutive fire and the move orders, to annihilate two Russian units. The elimination points for these victories pushed the Russian VP total down, so final objective scoring (net 4 points to the Axis), gave the Axis the victory. |
Sunday, August 17, 2014
Scenario 9 : Rush To Contact, third time lucky
Scenario 9 : Rush To Contact
Place : near Hitdorf, Germany
Date : April 6th, 1945
A description of scenario 9 : Rush To Contact from the GMT Games board game Combat Commander : Europe
www.gmt.games
Setup
Lt.Wray and his men entered the area on the high ground just behind objective 1. The plan was to swiftly claim objectives 1, 2 and 3, overwhelming any light German resistance that they may encounter.
There were no Germans in sight, but an LMG team, one German squad and an officer were known to be occupying objective 3, one building of a small farmhouse complex hidden from view in the valley below. Mines were in the area protecting the farmhouse, in the house on the hill looking down into the farm house as well as in front of objective 2 and in the woods beside objective 3
Move Out!
Wray moved up with 5 of the six squads and made it to the ridge without much incident. A concealed mine field delayed one squad a but they swiftly recovered their composure. The first objective (1) , a small farmhouse, fell to the Americans in this early advance.
Wray got busy organizing a firing line along the ridge , looking down in to the farmhouse.

Reinforcements already ?
To Lt. Wray's dismay, almost as he began firing, more Germans came into view in the distance; a German HMG established itself on the hill off to the right, with a view that dominated the entire battle field. Some German volks grenadier squads appeared directly to their front, some in the clear and some concealed in some brush, blocking an easy exit.
But then to remedy the situation American reinforcements rapidly arrived to back up Wray, so many and so fast that it was getting quite crowded in the rear area. And finally a US 105mm artillery battery was assigned! All seemingly at once, much to the Germans chagrin. All the American reinforcements came in on the left edge of the map, ready to back up Wray in the attack on objectives 3/4.
Hubbard started pushing up through the brush on the left, to cause a distraction and to get a little cover from the German HMG over to the right, and to spread out the concentrated U.S. forces that were all now in plain view of the German HMG.
Wray and his men formed a line along the ridge and started pounding the central farmhouse complex, (objectives 2 and 3). The Germans ran squads up the road to try and reinforce the area. One squad did not make it, one squad and a LMG team did.
The German HMG kept up a harassing fire that pinned down groups of paras but they soon came back into action. One exception was Sgt. Smith; running up the road from the rear to try and join the medium MG team in order to direct it more effectively, he was cut down.
The US 105mm battery attempted to drop smoke on the German HMG but the rounds just fell short, not hindering the HMG on the higher elevation at all.
German mortar fire was called in on the Americans; they were packed into a small area and so were hard to miss. On this occasion it was largely ineffective as the American swiftly recovered. However the potential for causing the paratroops extreme discomfort was there, particularly in combination with the incoming HMG fire. Fortunately for the Americans, German communications with the mortar team were not good, and the mortar was not much of a factor for the entire battle.
"The Axis plan was to defend objectives 2 and 3 tenaciously, firing as often as possible, so as to reach the first time trigger. This part of the plan worked to perfection.
The objective scoring made it essential to either hold objectives 2 or 3, or cause enough Allied casualties to compensate for their loss. The first time trigger occurred quite early, and massive German reinforcements entered the southern edge of the board. So far, so good. However, the plan was ultimately defeated by superior Allied logistics, a common problem for us during 1945.
Within a single day, it seems, three additional time triggers were hit, resulting in a flood of elite Allied reinforcements, who also showed the mobility to sweep to the ridge line running from H3 southeast to L5. This enabled the Allies to set up a powerful and persistent bombardment of both objectives 2 and 3, which soon resulted in serious Axis casualties. The casualty track started to fill. The combination of superior numbers, firepower, and the terrain advantage of shooting downhill onto the troops in the plain below began to tell. However, this need not have been decisive.
The Axis set up a powerful HMG position on the high ridge just to the northeast of objective 5, and for a long time had a powerful combined firing position on Objectives 2 and 3. This HMG, supported by the best Axis leader, combined with the 1-2 punch of the firing position on the objectives, should have been able to inflict heavy, if not decisive casualties on the exposed Allied positions to the north east of objectives 2 and 3, and to make it prohibitively expensive for the Allies to move across the rather open terrain.
Place : near Hitdorf, Germany
Date : April 6th, 1945
A description of scenario 9 : Rush To Contact from the GMT Games board game Combat Commander : Europe
www.gmt.games
Setup
Lt.Wray and his men entered the area on the high ground just behind objective 1. The plan was to swiftly claim objectives 1, 2 and 3, overwhelming any light German resistance that they may encounter.
There were no Germans in sight, but an LMG team, one German squad and an officer were known to be occupying objective 3, one building of a small farmhouse complex hidden from view in the valley below. Mines were in the area protecting the farmhouse, in the house on the hill looking down into the farm house as well as in front of objective 2 and in the woods beside objective 3
Move Out!
Wray moved up with 5 of the six squads and made it to the ridge without much incident. A concealed mine field delayed one squad a but they swiftly recovered their composure. The first objective (1) , a small farmhouse, fell to the Americans in this early advance.
Wray got busy organizing a firing line along the ridge , looking down in to the farmhouse.

Reinforcements already ?
To Lt. Wray's dismay, almost as he began firing, more Germans came into view in the distance; a German HMG established itself on the hill off to the right, with a view that dominated the entire battle field. Some German volks grenadier squads appeared directly to their front, some in the clear and some concealed in some brush, blocking an easy exit.
But then to remedy the situation American reinforcements rapidly arrived to back up Wray, so many and so fast that it was getting quite crowded in the rear area. And finally a US 105mm artillery battery was assigned! All seemingly at once, much to the Germans chagrin. All the American reinforcements came in on the left edge of the map, ready to back up Wray in the attack on objectives 3/4.
Hubbard started pushing up through the brush on the left, to cause a distraction and to get a little cover from the German HMG over to the right, and to spread out the concentrated U.S. forces that were all now in plain view of the German HMG.
Wray and his men formed a line along the ridge and started pounding the central farmhouse complex, (objectives 2 and 3). The Germans ran squads up the road to try and reinforce the area. One squad did not make it, one squad and a LMG team did.
The German HMG kept up a harassing fire that pinned down groups of paras but they soon came back into action. One exception was Sgt. Smith; running up the road from the rear to try and join the medium MG team in order to direct it more effectively, he was cut down.
The US 105mm battery attempted to drop smoke on the German HMG but the rounds just fell short, not hindering the HMG on the higher elevation at all.
German mortar fire was called in on the Americans; they were packed into a small area and so were hard to miss. On this occasion it was largely ineffective as the American swiftly recovered. However the potential for causing the paratroops extreme discomfort was there, particularly in combination with the incoming HMG fire. Fortunately for the Americans, German communications with the mortar team were not good, and the mortar was not much of a factor for the entire battle.
 |
| Shooting Gallery |
The massed American fire power on the ridge was beginning to have some effect on the Germans in the farmhouses below. The German squad in the building to the American left (objective 2) was quickly broken. The arrival of a German Hero rallied the men, but not for long. Some sniper activity in the area combined with more massed US firepower eliminated the squad, as well as the LMG weapons team that had setup in the minefield to the right of objective 3. Objective 3 was of particular interest to the Americans (hidden objective) and news had come down from above that all the objectives were considered to be of extreme value (open objective drawn added 2 more VPs to each building for a total of 5 per building).
Lt.Wray Leads The Way
Time was moving along fast, all the reinforcements from both sides had arrived, but most of the objectives remained in German hands. Simply shooting down the German units was taking too long and something had to be done to grab the farmhouse complex before night fell. Wray gave the signal and advanced to the wall outside the farmhouse, along with a team carrying a satchel charge. They successfully exiting the minefield, and were now just a stone wall away from the farmhouse defenders. The satchel charge was hurled at the German squad but did not do any good. Return fire from the Germans wounded Lt. Wray, but despite this he led his men into a melee in the left most farmhouse (objective 2). Wray and his men rapidly dealt with the German hero and the German officer they found lurking in the building. But even though Lt. Wray was now in the cover of the building, more fire from the Germans in the adjacent building found a mark, and the gallant Lt. Wray died from his wounds.
At this point events stagnated for a while on the US side, as two of their best leaders had been killed , and the other leaders on the ridge were all wounded, or pinned down by increasingly effective HMG fire. There was a lot of disjointed shooting from the Americans, waiting for their leaders to recover. But it was largely ineffective, with the exception of driving one Volksgrenadier squad into full retreat off the map. The German HMG squad was broken with some sharpshooting from the US medium MG team, but another German Hero sprang up and rallied the team.
Hubbard moved his men up on the left and further into the brush, threatening the Volksgrenadier squads on the map edge, to further distract the Geman HMG from finishing off the stricken leaders and men that were becoming a common site on the ridge.
Then Lt. Blenkinship broke the impasse by rushing up the road from the rear area with a fresh squad. He ran right up to the farmhouse (objective 3) with no reaction from the German occupiers. Presumably they were still celebrating the death of Lt.Wray. Wasting no time, Blenkinship and his men stormed the building, using multiple ambushes. The surprised Germans had no response to this daring move and were gunned down.
Now the central farmhouse complex was in US hands. The value of each objective had increased and this, along with the German melee casualties gave the US a sizeable lead.
At this point, as if things had not been going badly enough for the Germans, a series of events occurred stripping the Germans of their heavy weapons; accurate smoke from the US artillery caused the German HMG to move down from its commanding position on the ridge. Someone was careless in the move as shortly thereafter the German HMG broke down irreparably (jammed by an Event and then eliminated) , and the German mortar support was lost (radio broken twice).
The Germans were one unit away from their surrender level. The US losses were limited to two officers. With no more heavy weapons supporting his volksgrenadiers the German player resigned.
The Other Point Of View
The following is an excerpt from the intelligence debriefing of an Axis leader, captured during the Allied assault on Objectives 2 and 3)
The objective scoring made it essential to either hold objectives 2 or 3, or cause enough Allied casualties to compensate for their loss. The first time trigger occurred quite early, and massive German reinforcements entered the southern edge of the board. So far, so good. However, the plan was ultimately defeated by superior Allied logistics, a common problem for us during 1945.
However, Axis logistics failed us. There was hardly a time from time trigger turn 3, until long after time trigger turn 6, that Axis units could fire more than one time per turn. This included the poorly supplied Axis artillery, which only fired for effect a single time during the entire game, before being routed by consecutive 'artillery denied' effects. So, superior Allied logistics defeated us. Only careful analysis may tell if there is, or is not, a better Axis plan."
Conclusion
So another victory for me. But not so fast! We actually played this scenario three times , this AAR being the report of the third time through. The first two times I played the Germans, setting up way too close to the US on the first occasion, and in objectives 2 and 3 on the second . Not pulling a Time card for the (short ) duration of the battles, the US closed in with satchel charges and, well, that was that.
The third time through we switched sides, and is the subject of this AAR. Time! events rained down one after another, to the initial delight of the German player, but then they kept on coming. Faced with overwhelming numbers of US troops plus artillery, it was in my mind a foregone conclusion.
So although any game of CC is a good game, I would not rank this as my favorite scenario, simply because of the huge swings in balance the Time events can bring to the game.
The breaking of the German HMG, causing its subsequent elimination was quite humorous, well at least I thought so. Smoke landed on the HMG forcing it to move down slope and a hex or two closer to the action. The German player pulled an event that caused a weapon to break closest to a random hex. Because the HMG had moved, it was the closest. This was a catastrophic loss for the Germans.
Sunday, July 27, 2014
Scenario 8 : Breakout Dance
Scenario 8 : Breakout Dance
Russia, January 1943.
A description of scenario 8 : Breakout Dance from the GMT Games board game Combat Commander : Europe
www.gmt.games
Lt.Schrader and his men had spent the day concealed in their slit trenches, trying to keep warm while staying out of sight of Russian patrols. The men knew that the Russians were very close by, partially hidden in the brush. Orders had come through to effect a breakout that night. The good news was that reports received indicated that there were no heavy weapons to their immediate front and no officers had been observed . The nearest medium machine gun was positioned on the hill to the German left and had no view into their slit trenches. That was also where the nearest Russian officer was located. The Germans were facing a line of Russian rifle squads, one group with a light machine gun. So the Russians Schrader and his men were facing were leaderless for the time being.
Recon reports also indicated that the Russians were spread in a line extending all the way to the left of the German position. The bad news was that there were no gaps in the line, but the good news was that once the Germans were through the Russians lying immediately to their front the route to safety would be open. More good news was that the bulk of the Russians were therefore quite far away from where the action was about to occur.
The plan was that after darkness fell, fire would be focused on the Russian squads immediately facing the Germans. The Russians would be broken or eliminated, clearing the way for movement through the Russian lines and off to safety. This had to happen fast, before any Russian heavy weapons, reinforcements and leaders arrived from the (German) left flank, and before dawn.
FIRE!
At the signal, the Germans opened up, firing repeatedly at the Russian squads, with spray fire and MG fire bonuses. This had remarkably little effect; the Russians were hard to see through the brush compounded by the dark of night. Alerted by all the noise the Russians started dragging their machine guns from the far side of the hill toward the sound of gunfire and moved in Sgt.Maisky to organize the defenses immediately to the front of the firing Germans.
After pounding the Russian squads relentlessly, Schrader was disappointed to see absolutely no effect. The situation was deteriorating with Maisky directing the Russian light machine gun equipped squad and bolstering their morale. But the good news was that the Russian return fire had been similarly ineffective. Sniper activity had slowed down the team moving in the Russian machine gun. However a change of tactics was required by the Germans before the Russians were able to concentrate or organize a defense in depth.
Fortune Favors The Brave
Leaving Sgt.Ganz and a squad in the slit trenches on the left flank to keep on shooting as they had the clearest view, Lt. Schrader and two squads started moving forward. They moved in to the cover of the brush and toward the Russians. The combination of the darkness and the limited visibility through the brush was too much for effective fire. The range had to be closed. This triggered some opportunity fire from the Russians, but this was ineffective as the Germans swiftly recovered.
Shooting from closer range and adding in hand grenades to the mix still did not cause the Russians to flinch, but did fortuitously did cause one of the German squads with Schrader to deploy into two 2 man teams.
With the Russians reinforcements inching toward the area, Schrader decided to force the issue and advanced to melee with one full squad and one team. He didn't have time to wait to setup an ambush, but he did have the initiative.
Fortune favored the brave and the Russian squad was not able to organize an ambush. The Germans with a hefty advantage in firepower eliminated the Russian squad, forcing a hole in the Russian line. The German team left out of the melee moved forward into the area of the melee, brushing off some opportunity fire from the Russians and moved off into the night. The Russian line was broken!
The Russian leader Sgt. Maisky saw that the German team was escaping. Things were not going well for the Russians. The Russian machine guns had not arrived the German firepower had eliminated on more Russian squad. The Russian line that had stood up to all that intense German firepower in the early stages of the battle was now in tatters. But then as Schrader and the victors of the breakthrough melee moved off in their escape attempt through the clear terrain they were pinned down by Russian opportunity fire and their escape attempt delayed.
Throw in a freak event where the Russian high command rewarded the Russians for the objectives they had in their possession, the fact that dawn was nearly breaking (one sudden death roll had already occurred) and no Germans had actually exited the arena, it all meant that the affair hung in the balance even with the line shattered. If Lt. Schrader and his group could be eliminated before dawn came, perhaps the Russians could snatch victory from the jaws of defeat.
So Maisky moved his Russians off in pursuit of Schrader. He needed to close the range for fire to be effective, but that was not what he had in mind. He had a more desperate plan.
Sgt. Ganz, seeing his opportunity, moved out of his slit trench and into the brush recently vacated by the Russians. Some wounded Russians showed up to the rear of Sgt.Ganz but they were to have no impact on the battle.
End Game
Lt. Schrader advanced his men , including the broken team, into the cover of some trees to give the broken squad some relief, and there they lingered as Maisky led his Russians toward them from the night. Sgt. Maisky, knowing that it was not going to go well for him if he had to report the Germans had escaped, advanced on Schrader in a do or die attempt at saving the situation. If he could eliminate Schrader, and if those MGs ever arrived to engage Sgt. Ganz, he could turn this whole thing around. Dawn was about to break and the battle about to end one way or another. Maisky just needed to win this melee. A little under strength compared to the Germans (6 vs 7) but holding the initiative, Maisky gambled.
Neither side had any ambushes set up, and so the dice were rolled. For the Russians it was not to be. Fortune did not favor the Russian bravery and Maisky died leading his men to their deaths.
This failed gamble opened a huge hole in the Russian line and eliminated the only leader in the area, prompting the Russian side to resign.
Conclusion
Well, this was my first victory in a long time in CCE and I was pretty pleased with the way things went. Things almost went to plan! How often does that happen in CCE? The cards fell quite nicely for me, and I was not really hindered too much by the limited German discard.
The Russian special rule of only playing one command per turn really slows down any response. A Russian defense in depth would have been a possibility, allowing for a reserve to counter any German breakthrough, but that would have led to big gaps in the line guaranteeing a German breakthrough. So the Russians are in a tough spot.
The Germans, only having three units, have to be very cautious about engaging the Russians in melees. But I felt that the deployed squad reduced the impact any ambushes would have and justified the risk of going in not over stacked on the key German breakthrough melee. Something had to be done before the medium MGs and the Russian hordes arrived!
The time marker moved along fairly quickly in this game. At the point of the final melee I think the Germans were ahead by 4 VPs or so, but the Russians held a German secret objective, albeit only worth 1VP. If Maisky had been victorious and eliminated Schrader in that final melee the VPs would have swung back into Russia's favor. There had already been one sudden death roll, and Maisky would have been well positioned to delay Ganz. The Russian MGs would have finally arrived and ...well that was not to be.
All in all another fun, tense game and now on to Rush to Contact!
Russia, January 1943.
A description of scenario 8 : Breakout Dance from the GMT Games board game Combat Commander : Europe
www.gmt.games
Lt.Schrader and his men had spent the day concealed in their slit trenches, trying to keep warm while staying out of sight of Russian patrols. The men knew that the Russians were very close by, partially hidden in the brush. Orders had come through to effect a breakout that night. The good news was that reports received indicated that there were no heavy weapons to their immediate front and no officers had been observed . The nearest medium machine gun was positioned on the hill to the German left and had no view into their slit trenches. That was also where the nearest Russian officer was located. The Germans were facing a line of Russian rifle squads, one group with a light machine gun. So the Russians Schrader and his men were facing were leaderless for the time being.
Recon reports also indicated that the Russians were spread in a line extending all the way to the left of the German position. The bad news was that there were no gaps in the line, but the good news was that once the Germans were through the Russians lying immediately to their front the route to safety would be open. More good news was that the bulk of the Russians were therefore quite far away from where the action was about to occur.
The plan was that after darkness fell, fire would be focused on the Russian squads immediately facing the Germans. The Russians would be broken or eliminated, clearing the way for movement through the Russian lines and off to safety. This had to happen fast, before any Russian heavy weapons, reinforcements and leaders arrived from the (German) left flank, and before dawn.
 |
| Setup |
At the signal, the Germans opened up, firing repeatedly at the Russian squads, with spray fire and MG fire bonuses. This had remarkably little effect; the Russians were hard to see through the brush compounded by the dark of night. Alerted by all the noise the Russians started dragging their machine guns from the far side of the hill toward the sound of gunfire and moved in Sgt.Maisky to organize the defenses immediately to the front of the firing Germans.
After pounding the Russian squads relentlessly, Schrader was disappointed to see absolutely no effect. The situation was deteriorating with Maisky directing the Russian light machine gun equipped squad and bolstering their morale. But the good news was that the Russian return fire had been similarly ineffective. Sniper activity had slowed down the team moving in the Russian machine gun. However a change of tactics was required by the Germans before the Russians were able to concentrate or organize a defense in depth.
Fortune Favors The Brave
Leaving Sgt.Ganz and a squad in the slit trenches on the left flank to keep on shooting as they had the clearest view, Lt. Schrader and two squads started moving forward. They moved in to the cover of the brush and toward the Russians. The combination of the darkness and the limited visibility through the brush was too much for effective fire. The range had to be closed. This triggered some opportunity fire from the Russians, but this was ineffective as the Germans swiftly recovered.
Shooting from closer range and adding in hand grenades to the mix still did not cause the Russians to flinch, but did fortuitously did cause one of the German squads with Schrader to deploy into two 2 man teams.
With the Russians reinforcements inching toward the area, Schrader decided to force the issue and advanced to melee with one full squad and one team. He didn't have time to wait to setup an ambush, but he did have the initiative.
Fortune favored the brave and the Russian squad was not able to organize an ambush. The Germans with a hefty advantage in firepower eliminated the Russian squad, forcing a hole in the Russian line. The German team left out of the melee moved forward into the area of the melee, brushing off some opportunity fire from the Russians and moved off into the night. The Russian line was broken!
 |
| Breakthrough! |
Throw in a freak event where the Russian high command rewarded the Russians for the objectives they had in their possession, the fact that dawn was nearly breaking (one sudden death roll had already occurred) and no Germans had actually exited the arena, it all meant that the affair hung in the balance even with the line shattered. If Lt. Schrader and his group could be eliminated before dawn came, perhaps the Russians could snatch victory from the jaws of defeat.
So Maisky moved his Russians off in pursuit of Schrader. He needed to close the range for fire to be effective, but that was not what he had in mind. He had a more desperate plan.
Sgt. Ganz, seeing his opportunity, moved out of his slit trench and into the brush recently vacated by the Russians. Some wounded Russians showed up to the rear of Sgt.Ganz but they were to have no impact on the battle.
End Game
Lt. Schrader advanced his men , including the broken team, into the cover of some trees to give the broken squad some relief, and there they lingered as Maisky led his Russians toward them from the night. Sgt. Maisky, knowing that it was not going to go well for him if he had to report the Germans had escaped, advanced on Schrader in a do or die attempt at saving the situation. If he could eliminate Schrader, and if those MGs ever arrived to engage Sgt. Ganz, he could turn this whole thing around. Dawn was about to break and the battle about to end one way or another. Maisky just needed to win this melee. A little under strength compared to the Germans (6 vs 7) but holding the initiative, Maisky gambled.
Neither side had any ambushes set up, and so the dice were rolled. For the Russians it was not to be. Fortune did not favor the Russian bravery and Maisky died leading his men to their deaths.
This failed gamble opened a huge hole in the Russian line and eliminated the only leader in the area, prompting the Russian side to resign.
Conclusion
Well, this was my first victory in a long time in CCE and I was pretty pleased with the way things went. Things almost went to plan! How often does that happen in CCE? The cards fell quite nicely for me, and I was not really hindered too much by the limited German discard.
The Russian special rule of only playing one command per turn really slows down any response. A Russian defense in depth would have been a possibility, allowing for a reserve to counter any German breakthrough, but that would have led to big gaps in the line guaranteeing a German breakthrough. So the Russians are in a tough spot.
The Germans, only having three units, have to be very cautious about engaging the Russians in melees. But I felt that the deployed squad reduced the impact any ambushes would have and justified the risk of going in not over stacked on the key German breakthrough melee. Something had to be done before the medium MGs and the Russian hordes arrived!
The time marker moved along fairly quickly in this game. At the point of the final melee I think the Germans were ahead by 4 VPs or so, but the Russians held a German secret objective, albeit only worth 1VP. If Maisky had been victorious and eliminated Schrader in that final melee the VPs would have swung back into Russia's favor. There had already been one sudden death roll, and Maisky would have been well positioned to delay Ganz. The Russian MGs would have finally arrived and ...well that was not to be.
All in all another fun, tense game and now on to Rush to Contact!
Subscribe to:
Posts (Atom)